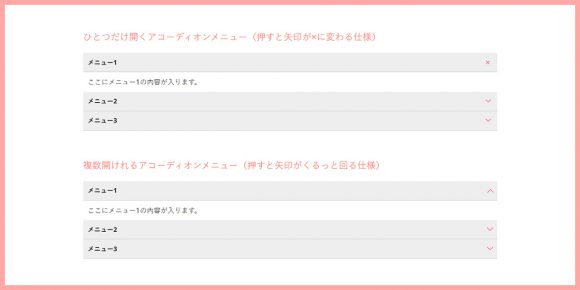
簡単に実装できるアコーディオンメニューのメモ。
私のようにjQueryやjavascriptがあまりわからない人でも
わかりやすくて実装しやすいアコーディオンメニューのご紹介。DEMOページつくりました。
私のようにjQueryやjavascriptがあまりわからない人でも
わかりやすくて実装しやすいアコーディオンメニューのご紹介。DEMOページつくりました。
もくじ
javascript
以下のサイトを参考にしてご説明します。
私は以下のjsを外部ファイルで保存して、呼び出して使っています。
複数の設置もできて便利です。
複数開けれるアコーディオンメニュー
[blogcard url=”http://jsdo.it/hibiki443/r8hF”]
(function($) {
	// 読み込んだら開始
	$(function() {
		// アコーディオン
		var accordion = $(".accordion");
		accordion.each(function () {
			var noTargetAccordion = $(this).siblings(accordion);
			$(this).find(".switch").click(function() {
			$(this).next(".contentWrap").slideToggle();
			$(this).toggleClass("open");
			noTargetAccordion.find(".contentWrap").slideUp();
			noTargetAccordion.find(".switch").removeClass("open");
			});
		});
	});
})(jQuery);
ひとつだけ開けるアコーディオンメニュー
(function($) {
// 読み込んだら開始
$(function() {

// アコーディオン
$(".accordion").each(function() {
var accordion = $(this);
$(this).find(".switch").click(function() {
//$("> .switch", this).click(function() { // 上段の別の書き方
var targetContentWrap = $(this).next(".contentWrap");
if ( targetContentWrap.css("display") === "none" ) {
accordion.find(".contentWrap").slideUp();
accordion.find(".switch.open").removeClass("open");
}
targetContentWrap.slideToggle();
$(this).toggleClass("open");
});
});

});
})(jQuery);
HTML
class=”displayNone”には”display: none;”が指定されているので
付与することによって、アコーディオンの中身を隠しておけます。
最初から開いておきたい場合は”displayNone”はつけません。
以下のhtmlでは、divで囲っていますが、
ulでもdlでも動きます。
アコーディオンの一番外枠に、class=”accordion”、
ボタン部分に、class=”switch”、
内容に、class=”contentWrap”を付与します。
<div class="accordion">
<p class="switch">アコ―ディオンボタン01</p>
<div class="contentWrap displayNone">
ここにアコーディオン01の中身が入ります。
</div>
<p class="switch">アコ―ディオンボタン02</p>
<div class="contentWrap displayNone">
ここにアコーディオン02の中身が入ります。
</div>
</div><!-- accordion -->
css
開いているclass=”swich”に”open”というclassが付与されます。
以下のcssは、DEMOページのスタイルと同様になります。
共通css
.displayNone {
display: none;
}
.accordion li {
border-bottom: 1px solid #ccc;
padding: 10px;
}
.accordion a {
display: block;
}
.contentWrap {
margin: 10px;
}
.switch {
cursor:pointer;
font-weight: bold;
padding:10px 40px 10px 10px;
font-size: 14px;
background: #eee;
border-bottom: 1px solid #ccc;
position: relative;
}
押すと矢印が×に変わる仕様
右端の矢印がくるっとまわるのがなんだかかわらしいです。
.switch:after {
position: absolute;
top: 60%;
right: 10px;
margin-top: -18px;
content: '>';
font-size: 18px;
font-weight: bold;
-moz-transform: rotate(90deg);
-ms-transform: rotate(90deg);
-webkit-transform: rotate(90deg);
transform: rotate(90deg);
-moz-transition: all, 0.25s, linear;
-o-transition: all, 0.25s, linear;
-webkit-transition: all, 0.25s, linear;
transition: all, 0.25s, linear;
font-family: sans-serif;
color: #FF6685;
}
.switch.open:after {
-moz-transform: translate(0, 50%);
-ms-transform: translate(0, 50%);
-webkit-transform: translate(0, 50%);
transform: translate(0, 50%);
-moz-transform: rotate(-90deg);
-ms-transform: rotate(-90deg);
-webkit-transform: rotate(-90deg);
transform: rotate(-90deg);
font-family: sans-serif;
}
押すと矢印が×に変わる仕様
お次は矢印がくるっとまわるのではなく、
矢印から中身が開くと×印になる仕様になっています。
.switch:after {
content: ">";
position: absolute;
right: 10px;
top: -100%;
bottom: -100%;
margin: auto;
font-size: 16px;
height: 16px;
-moz-transform: rotate(90deg);
-ms-transform: rotate(90deg);
-webkit-transform: rotate(90deg);
transform: rotate(90deg);
font-family: sans-serif;
}
.switch.open:after {
content: "x";
}
